
A Machine Checkering Fixture
+7
AC Baker
Cmysix
samtoast
Tripscape
jglenn21
james r chapman
Dr.Don
11 posters
Page 1 of 1

A Machine Checkering Fixture
![]() by Dr.Don 12/30/2023, 3:27 pm
by Dr.Don 12/30/2023, 3:27 pm
I have a nice set of checkering files and have done a fair amount of checkering to small items like mainspring housings and such. But the amount of effort required and the potential for disaster always dissuaded me from trying to hand checker 1911 front straps. I know that various gunsmiths machine checker these, but I have never seen a fixture for doing this offered for sale anywhere. I have a lathe, small mill, and a rotary table so I decided to see if I could come up with my own machine checkering fixture.
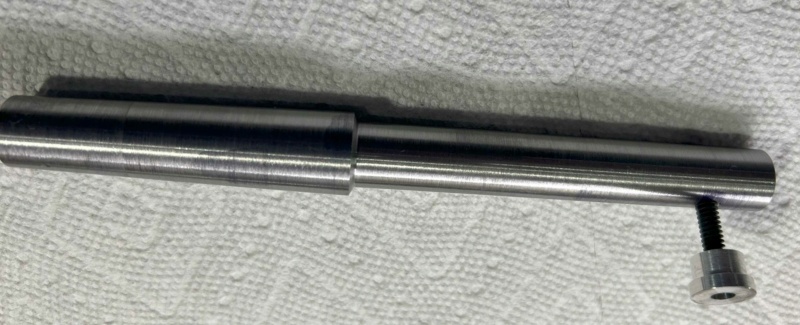
The first problem is to get the frame aligned with the rotational axis of the rotary table. For this I made a spindle. One end is turned to a #2 Morse taper to fit my rotary table. The rest is turned to a diameter of 0.550”, which seemed to fit the interior of the front strap of most of the 1911 frames I had available to try. The spindle is shown here with a cross bolt with a broad flat head which can be jammed against the flat back of the magazine well to fix the frame in place on the spindle.
With the frame and spindle mounted on the rotary table use a dial indicator to determine whether the rotational radius of the frame is correct. That is, does the indicator vary as the table is turned.

I found that I needed to shim the frame out about 0.040” to get the rotational radius correct. I used a piece of 0.040” brass rod between the spindle and frame interior to accomplish this.
While the frame/spindle arrangement feels quite firm, it needs more support to stay in place under the cutting forces of the mill. For that I made a two-piece vise I could mount on the rotary table face. It is shown in the next photo.

With the fixture completed the first step in the process is to mount the rotary table on the mill table and precisely align the rotary table axis with the mill spindle axis. A coaxial indicator is the best means of doing this. The Y table axis of the mill is then locked in place and only the X-axis is used for controlling the cutter depth. Once this is done, the spindle, frame, and vise are mounted on the rotary table.
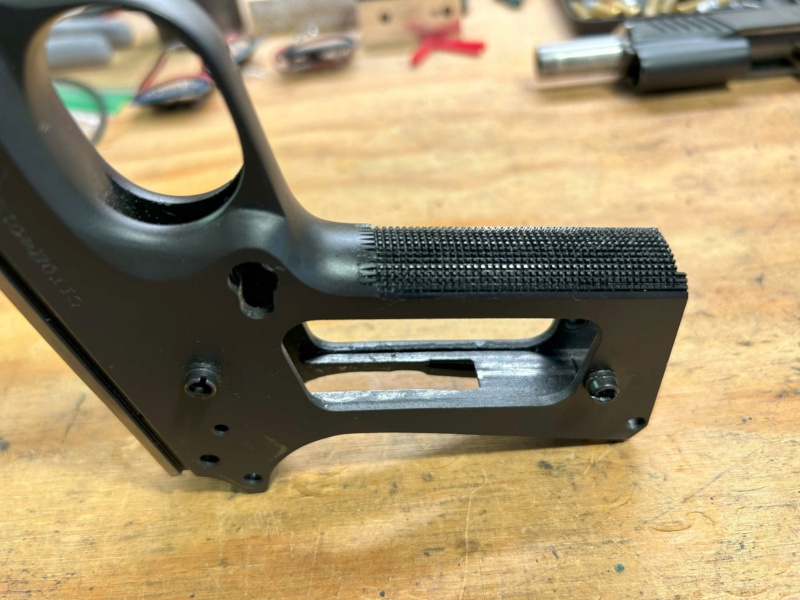
Before any checkering cuts were made a long reach end mill was used to even up the frame radius. You only want to take a few thousandths off here for fear of thinning the front strap too much to support checkering.

A 60 degree cutter was used to make the checkering cuts. I obtained mine from EGW. My mill has a digital readout on the Z-axis and allowed me to precisely control the spacing of the horizontal cuts on the frame.


With the horizontal cuts complete, the rotary table is reset on the mill for what will be the vertical cuts on the front strap. Leave the frame in the fixture when resetting the rotary table to its new position. The table must be set so the frame is accurately aligned with the X-axis of the mill. Otherwise the depth of cut will vary from one end to the other. Use a dial indicator to check this.

Release the lock on the mill’s Y-axis and use the Y-axis controls to set the depth of each cut. The Z-axis position of the cutter should be set so it is precisely mid-frame when the frame is rotated to a horizontal position. This will cause all of the cuts to be pointed precisely at the center of rotation of the frame. You will probably need to do some calculations based upon the radius of rotation of your frame setup to determine how much to rotate the table for each cut. For my setup, and using 20 line-per-inch checkering, the table needed to be rotated 6.4 degrees (6 degrees and 24 minutes) for each cut.
I should note that it is difficult to see the cutter in operation in this arrangement. Be sure and use a piece of tape on the mill with a mark on it to indicate where you are to stop the cut. You do not want these cuts to end in different places on the frame.
My first attempt using this fixture turned out reasonably well. The next one should be better.
It is 20 lines per inch, and I used a cutter depth of 0.025”. I think next time I would increase that to at least 0.030” to bring the points to a slightly sharper profile.
I realize not everyone has access to the machinery required to do machine checkering. But some folks do, and perhaps some will be inspired to share their own fixtures and approaches to this job. I also thought that the process might be interesting even to those who don’t have access to the machinery described here. And for those who do it all by hand, you have my deep admiration.
The first problem is to get the frame aligned with the rotational axis of the rotary table. For this I made a spindle. One end is turned to a #2 Morse taper to fit my rotary table. The rest is turned to a diameter of 0.550”, which seemed to fit the interior of the front strap of most of the 1911 frames I had available to try. The spindle is shown here with a cross bolt with a broad flat head which can be jammed against the flat back of the magazine well to fix the frame in place on the spindle.

With the frame and spindle mounted on the rotary table use a dial indicator to determine whether the rotational radius of the frame is correct. That is, does the indicator vary as the table is turned.

I found that I needed to shim the frame out about 0.040” to get the rotational radius correct. I used a piece of 0.040” brass rod between the spindle and frame interior to accomplish this.
While the frame/spindle arrangement feels quite firm, it needs more support to stay in place under the cutting forces of the mill. For that I made a two-piece vise I could mount on the rotary table face. It is shown in the next photo.

With the fixture completed the first step in the process is to mount the rotary table on the mill table and precisely align the rotary table axis with the mill spindle axis. A coaxial indicator is the best means of doing this. The Y table axis of the mill is then locked in place and only the X-axis is used for controlling the cutter depth. Once this is done, the spindle, frame, and vise are mounted on the rotary table.
Before any checkering cuts were made a long reach end mill was used to even up the frame radius. You only want to take a few thousandths off here for fear of thinning the front strap too much to support checkering.

A 60 degree cutter was used to make the checkering cuts. I obtained mine from EGW. My mill has a digital readout on the Z-axis and allowed me to precisely control the spacing of the horizontal cuts on the frame.


With the horizontal cuts complete, the rotary table is reset on the mill for what will be the vertical cuts on the front strap. Leave the frame in the fixture when resetting the rotary table to its new position. The table must be set so the frame is accurately aligned with the X-axis of the mill. Otherwise the depth of cut will vary from one end to the other. Use a dial indicator to check this.

Release the lock on the mill’s Y-axis and use the Y-axis controls to set the depth of each cut. The Z-axis position of the cutter should be set so it is precisely mid-frame when the frame is rotated to a horizontal position. This will cause all of the cuts to be pointed precisely at the center of rotation of the frame. You will probably need to do some calculations based upon the radius of rotation of your frame setup to determine how much to rotate the table for each cut. For my setup, and using 20 line-per-inch checkering, the table needed to be rotated 6.4 degrees (6 degrees and 24 minutes) for each cut.
I should note that it is difficult to see the cutter in operation in this arrangement. Be sure and use a piece of tape on the mill with a mark on it to indicate where you are to stop the cut. You do not want these cuts to end in different places on the frame.
My first attempt using this fixture turned out reasonably well. The next one should be better.

It is 20 lines per inch, and I used a cutter depth of 0.025”. I think next time I would increase that to at least 0.030” to bring the points to a slightly sharper profile.
I realize not everyone has access to the machinery required to do machine checkering. But some folks do, and perhaps some will be inspired to share their own fixtures and approaches to this job. I also thought that the process might be interesting even to those who don’t have access to the machinery described here. And for those who do it all by hand, you have my deep admiration.

Dr.Don- Posts : 808
Join date : 2012-10-31
Location : Cedar Park, TX
chiz1180, Chase Turner, AC Baker, Dan Webb, JRV, DK and TXTad like this post
Re: A Machine Checkering Fixture
![]() by james r chapman 12/30/2023, 3:42 pm
by james r chapman 12/30/2023, 3:42 pm
So, what’s the address for us to send all our frames!!

james r chapman- Admin
- Posts : 6085
Join date : 2012-01-31
Age : 75
Location : HELL, Michigan
Pinetree likes this post
Re: A Machine Checkering Fixture
![]() by jglenn21 12/30/2023, 4:44 pm
by jglenn21 12/30/2023, 4:44 pm
Don, the Keller fixture is designed for this job. Sold by Cylinder and Slide. You have to do a lot of frames to justify it though. 
Nice setup and work
Nice setup and work

jglenn21- Posts : 2575
Join date : 2015-04-07
Age : 75
Location : monroe , ga
Carl Taylor and Chase Turner like this post
Re: A Machine Checkering Fixture
![]() by Tripscape 12/30/2023, 4:48 pm
by Tripscape 12/30/2023, 4:48 pm
Wow, amazing job. I applaud you! Looks very professionally made.
Tripscape- Posts : 829
Join date : 2019-03-23
Gustavo1957 likes this post
Re: A Machine Checkering Fixture
![]() by Dr.Don 12/30/2023, 5:22 pm
by Dr.Don 12/30/2023, 5:22 pm
jglenn21,
Thanks for the info. I was unaware of the Keller fixture. Agree it would take a lot of work to cover the investment in it.
Don
Thanks for the info. I was unaware of the Keller fixture. Agree it would take a lot of work to cover the investment in it.
Don
Dr.Don- Posts : 808
Join date : 2012-10-31
Location : Cedar Park, TX
Re: A Machine Checkering Fixture
![]() by samtoast 12/30/2023, 7:20 pm
by samtoast 12/30/2023, 7:20 pm
thank you very much for documenting and sharing the process. Very helpful and inspiring!
samtoast- Posts : 140
Join date : 2022-10-03
Re: A Machine Checkering Fixture
![]() by Cmysix 12/30/2023, 8:38 pm
by Cmysix 12/30/2023, 8:38 pm
james r chapman wrote:So, what’s the address for us to send all our frames!!
DITTO, you need practice, I got frames
Cmysix- Posts : 330
Join date : 2022-12-23
Age : 65
Location : Opelika Alabama
AC Baker- Posts : 14
Join date : 2020-05-27
Age : 60
Location : Milford Sq., Pa
Re: A Machine Checkering Fixture
![]() by rfmiller 1/2/2024, 1:07 pm
by rfmiller 1/2/2024, 1:07 pm
Very interesting. I really enjoy these kinds of posts.
rfmiller- Posts : 113
Join date : 2012-08-19
Age : 70
Location : Missouri
Re: A Machine Checkering Fixture
![]() by denpython 1/2/2024, 2:39 pm
by denpython 1/2/2024, 2:39 pm
Thank you for sharing your innovative approach.
denpython- Posts : 10
Join date : 2013-10-28
Re: A Machine Checkering Fixture
![]() by 10sandxs 1/2/2024, 10:55 pm
by 10sandxs 1/2/2024, 10:55 pm
Thread mills are a readily available source for checkering cutters. I've used them for the "long" cuts for years. Been meaning to make a fixture for the cross cuts, but haven't gotten arround to it.
Double angle cutters also work, but have a larger diameter so you can't get quite as high.
https://www.suncoasttools.com/crm/ItemPage.aspx?ItemNumber=89TM-3/8+++SNGFORM66&VendorNumber=MELIN&Code=GOOGLEFEED
Double angle cutters also work, but have a larger diameter so you can't get quite as high.
https://www.suncoasttools.com/crm/ItemPage.aspx?ItemNumber=89TM-3/8+++SNGFORM66&VendorNumber=MELIN&Code=GOOGLEFEED
10sandxs- Posts : 939
Join date : 2016-01-29
Re: A Machine Checkering Fixture
![]() by 8eightring 1/3/2024, 1:37 pm
by 8eightring 1/3/2024, 1:37 pm
Clark Custom Guns has an interesting video on how they do checkering.
https://www.youtube.com/watch?v=Xu1kV5ndz2w
https://www.youtube.com/watch?v=Xu1kV5ndz2w
8eightring- Posts : 175
Join date : 2011-06-17
Location : Ohio
troystaten likes this post
Re: A Machine Checkering Fixture
![]() by Dr.Don 1/5/2024, 10:15 am
by Dr.Don 1/5/2024, 10:15 am
10sandxs,
The thread mill is a good suggestion. I used a double angle cutter almost 1 1/2" in diameter. The much smaller diameter of the thread mill would allow full depth cuts with much less overrun at the end on the long vertical cuts. It would also let you get higher as you mentioned.
Don
The thread mill is a good suggestion. I used a double angle cutter almost 1 1/2" in diameter. The much smaller diameter of the thread mill would allow full depth cuts with much less overrun at the end on the long vertical cuts. It would also let you get higher as you mentioned.
Don
Dr.Don- Posts : 808
Join date : 2012-10-31
Location : Cedar Park, TX
Re: A Machine Checkering Fixture
![]() by 10sandxs 1/5/2024, 10:33 pm
by 10sandxs 1/5/2024, 10:33 pm
And thier carbide... cuts nice...Dr.Don wrote:10sandxs,
The thread mill is a good suggestion. I used a double angle cutter almost 1 1/2" in diameter. The much smaller diameter of the thread mill would allow full depth cuts with much less overrun at the end on the long vertical cuts. It would also let you get higher as you mentioned.
Don
10sandxs- Posts : 939
Join date : 2016-01-29
» Checker front strap
» Benelli MP95E Ransom fixture
» Barrel Testing Fixture Question
» Hand Checkering advice
» Kitchen Table Checkering
» Benelli MP95E Ransom fixture
» Barrel Testing Fixture Question
» Hand Checkering advice
» Kitchen Table Checkering
Page 1 of 1
Permissions in this forum:
You cannot reply to topics in this forum|
|
|