Main spring and trigger adjustments
+13
rich.tullo
Froneck
DA/SA
r_zerr
chiz1180
NukeMMC
javaduke
Texasref
bruce martindale
jjfitch
jglenn21
Tripscape
hengehold
17 posters
Page 3 of 4
Page 3 of 4 •  1, 2, 3, 4
 Main spring and trigger adjustments
First topic message reminder :
I recently built a 45cal 1911. Used EGW kit for hammer/sear/disconnect or. Initially I experienced some light strikes (~30% failure rate) increased the main spring incrementally to 19, 20, & 21 lbs springs. Trigger felt great with a 19# spring but had to increase spring weight up to 21# before light strikes have been eliminated. Now the trigger does not feel great anymore: feels much heavier and somewhat clunky compared to the lighter springs. Is there something I can do to offset this increase in trigger weight/sear engagement weight?
Maybe adjust one of the fingers on the flat spring behind the grip safety to adjust sear & hammer engagement?
-Trevor
hengehold- Posts : 418
Join date : 2017-11-26
Location : VA
 Re: Main spring and trigger adjustments
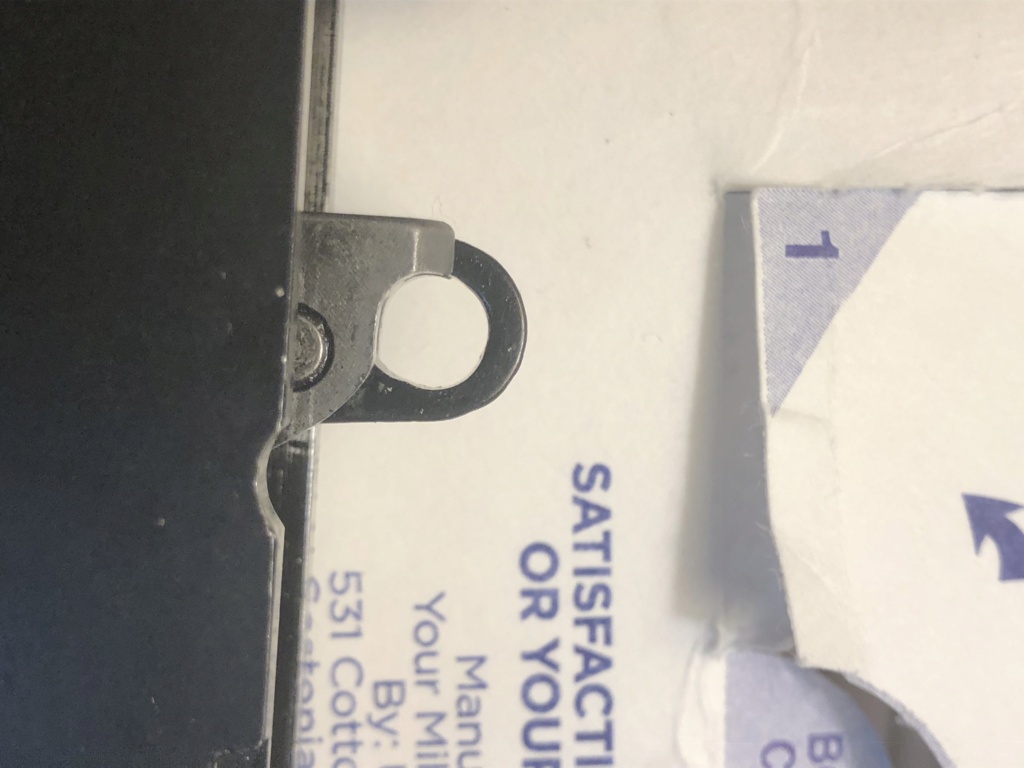
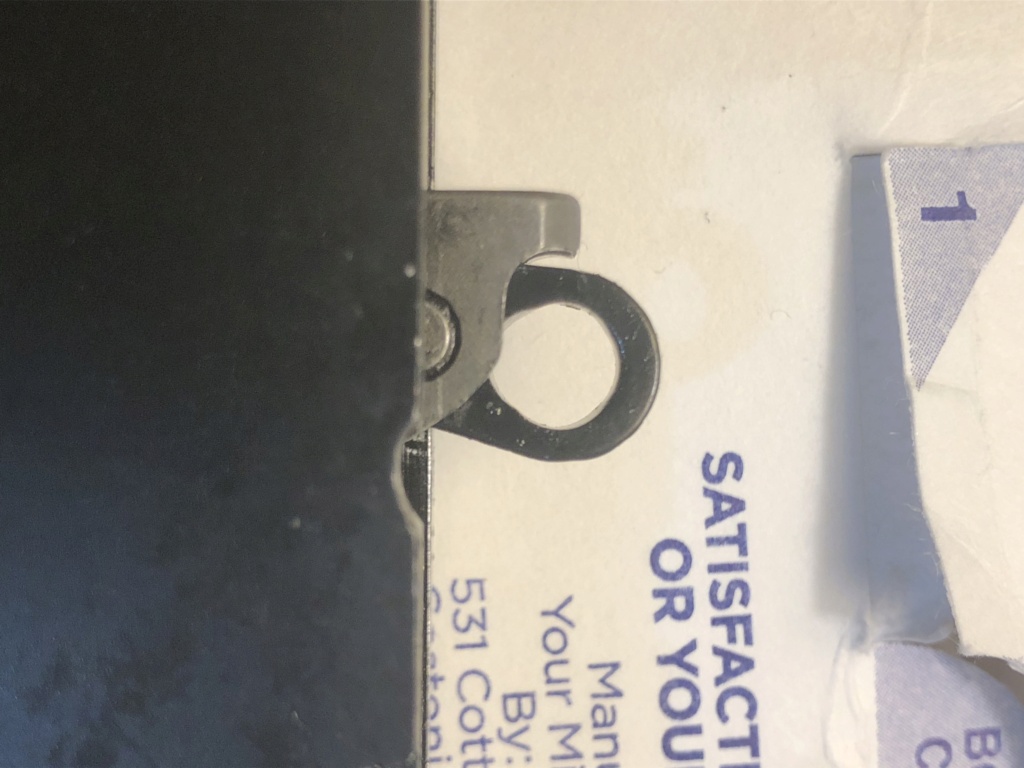
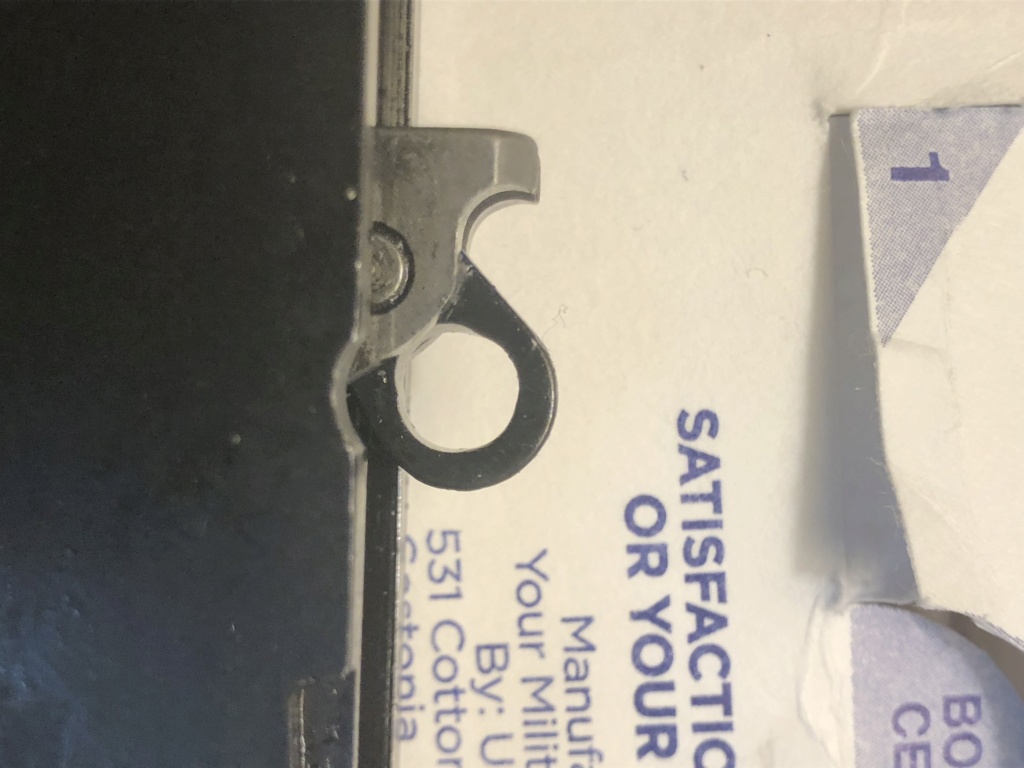
Barrel was installed a month ago. Smith had it on the shelf so used it out of his inventory.Froneck wrote:I don't like what I see of the lower lug. Can you make photo of link at 45 and 90 degrees? Do the test by inserting a full magazine in the closed slide. That barrel does not look new how long ago was it installed?
hengehold- Posts : 418
Join date : 2017-11-26
Location : VA
 Re: Main spring and trigger adjustments
There’s an issue with the consistency with the firing pin indentations. This indicates that the firing pin has a restriction in reaching the primer. Remove and clean the firing pin hole.
Another reason that can cause firing indentation variance is excessive headspace. Insert a case of known length into the barrel then measure to the case from the rear face of the hood. The total of the case length and the distance between the case and the hood should be between .898 and .920.
Also, doe# the barrel raise higher in the slide than it does when riding the slidestop pin?

Wobbley- Admin
- Posts : 4653
Join date : 2015-02-12
 Re: Main spring and trigger adjustments
I too am thinking the barrel is moving, assemble the gun without recoil spring and guide, test would be to remove the slide stop pin from the hole in the frame where pin has access to the mag. Drop it 90 degrees, push it all the way in, close the slide without the recoil spring in, is the pin tight when the slide is closed without any finger pressure on the slide? I see the pin hole in the link has been increased quite a bit. Thought the front of the lower lug has excessive rounding and front angle modified the high firing pin impact is not what would result if the OP makes sure the slide is completely closed when testing. Distance between the bottom of the lower lug and link retaining pin seems short indicating barrel might be low. It don't look as if the link is lifting the barrel. Also of interest is when light hit occurs, full magazine at or near empty? I don't know if a boxer primer will direct the pin off center if case was able to move. Would think it possible in Berdan primed case, no I don't think OP has Berdan primers. I do see what looks like a smeared pin dent on some cases and a clean dent in others, I have a pile of once fired brass from AMU range. I checked and they are all well defined with no smear. I would think from looking at the primer hits they are well hit, I don't think headspace is a cause. However head space is difficult to measure but putting an empty once fired case in the removed barrel, it should be flush with the hood! Measure the case length and the amount it sits below the hood. Photo of cases that did not fire with one hit will help.
Another issue he might have is the bushing! With the slide removed install the barrel and bushing, barrel should be free to move up/down enough to lock-up and drop down enough to allow the locking lugs to slide freely in the frame. No pressure should be required to push the barrel up or down.
Another issue he might have is the bushing! With the slide removed install the barrel and bushing, barrel should be free to move up/down enough to lock-up and drop down enough to allow the locking lugs to slide freely in the frame. No pressure should be required to push the barrel up or down.
Froneck- Posts : 1693
Join date : 2014-04-05
Age : 76
 Re: Main spring and trigger adjustments
Also not a gunsmith, but my $0.02:
Your firing pin strikes aren't a little off center...some of them are noticeably way off center to the point where the cylindrical portion of the primer body could start hindering firing pin impact. The effect of that could also open up the firing pin hole in the slide which causes other problems.
The portion of the link near the link pin looks freshest and untouched (smaller radius...closer to that of a stop pin). The elongating and distortion appears to me to be in the outer portion of the link. I would suppose that this gun unlocks quickly(?) and you feel quite a recoil snap(?). Perhaps leave the bottom lug alone for now and try some longer links such that the pin-to-lug fit is snug when you insert your pin and apply light pressure, pushing the link towards the breech end of the barrel. You should be able to rotate the pin when pushing on the link. This should also lift the impact point on the primer and increase upper lug engagement (your upper lugs look brand new, not even slightly scuffed).
Second, fit/install a (special order) EGW angle bore bushing about 0.002" over and under your slide ID and barrel OD measurements. For my first (practice) angle bore bushing, I bought a $30 3-jaw chuck on Amazon and chucked it in my 1/2" drill, locked in a vise (please don't laugh). Slow and steady material removal with extra-fine paper then at the end polishing paper, for a light press fit into the slide, and perhaps 0.0002" clearance over the barrel. Not too hard to fit the OD in the slide, but the ID fit is a slower process removing material, re-installing, checking for lockup, etc. When completed, the slide should retract freely about 0.080"(?) before unlocking.
Third, as others have mentioned, insure complete firing pin freedom of movement. It looks like hits leave a good impact crater. Also take a loaded round and drop it in the chamber. It should go "plunk" and require no force to fully chamber. If it doesn't, try reducing the COAL of your loaded rounds.
Fourth, is your EGW hammer the tapered style? I had a problem with one of the non-tapered hammers. It was too-wide for my (as machined) SA pistol...contacting the slide on one side. That caused inconsistent hits. The EGW tapered hammers will not contact the slide.
Last, if you have one, take about 20 rounds and uniform the primer pockets, before seating the primer. Amazing how much crud remains in primer pockets (here I'm assuming you are not using new ammo). After a match mishap (slamfire), it's standard practice for all of my rifle ammo.
tovaert- Posts : 432
Join date : 2018-11-28
RoyDean likes this post
 Re: Main spring and trigger adjustments
Is it just the picture or is the slide stop pin hole in the barrel link out of round?

chiz1180- Posts : 1346
Join date : 2019-05-29
Location : Ohio
 Re: Main spring and trigger adjustments
It's not your imagination. Someone's filed the hole in the link. That's not the preferred way to fit a barrel. Sometimes a tiny amount of filing is done to "egg" the hole for proper link down, but this link has had a whole lot of meat hacked away.chiz1180 wrote:Is it just the picture or is the slide stop pin hole in the barrel link out of round?
What's more worrisome in my view is that I don't see any of the normal signs that the barrel itself has been fitted to the slide. Judging by the pads in the number 1 lug recess, it's a Kart EZ-Fit or Exact-Fit barrel. On Kart barrels, the hood and lug areas come from Kart with a bead blast finis. In the fitting process, as areas are filed and polished, the bead blasting disappears. Here, even the fitting pads look like they've only been touched by the gun itself while being fired. If you just handed that barrel to me, I would never have guessed that it had been "hard fitted" to any gun by a gunsmith who was familiar with 1911s.
My two cents worth,
David
D.H. Grace- Posts : 23
Join date : 2017-12-29
 Re: Main spring and trigger adjustments
Out of round yes because someone made it bigger by filing or boring one side rather than get a longer link as David stated. The wall is quite thin and may crack.
I don't like the way the lower lug was done at all! It will lead to other problems.
If that barrel is as David said an EZ-fit or Exact-fit barrel that don't say much for the smith that built the gun!
The fact that the firing pin dent seems to move closer to the outer edge of the primer to closer to the center I find odd. Barrel seems to move!
How well does the side fit the frame?
Froneck- Posts : 1693
Join date : 2014-04-05
Age : 76
 Re: Main spring and trigger adjustments
Frank...curious...what don't you like about it? Is it the way the engagement radius continues slightly beyond 90 degrees? Do you prefer to taper (converge) the approach?Froneck wrote:I don't like the way the lower lug was done at all! It will lead to other problems.
tovaert- Posts : 432
Join date : 2018-11-28

Wobbley- Admin
- Posts : 4653
Join date : 2015-02-12
billybobluvshk likes this post
 Re: Main spring and trigger adjustments
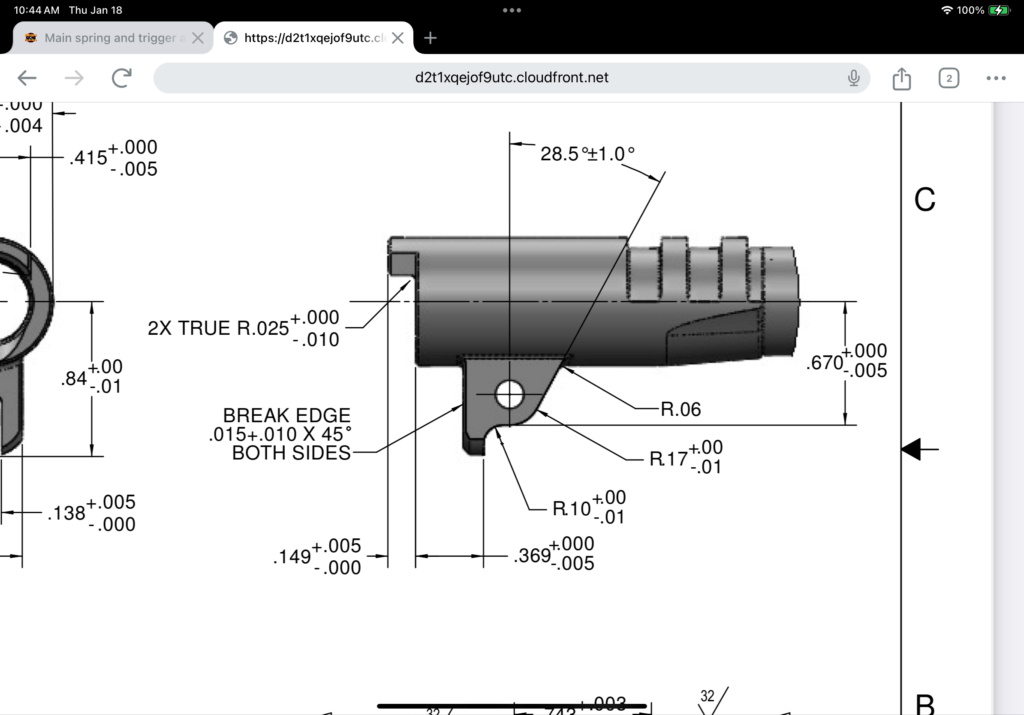
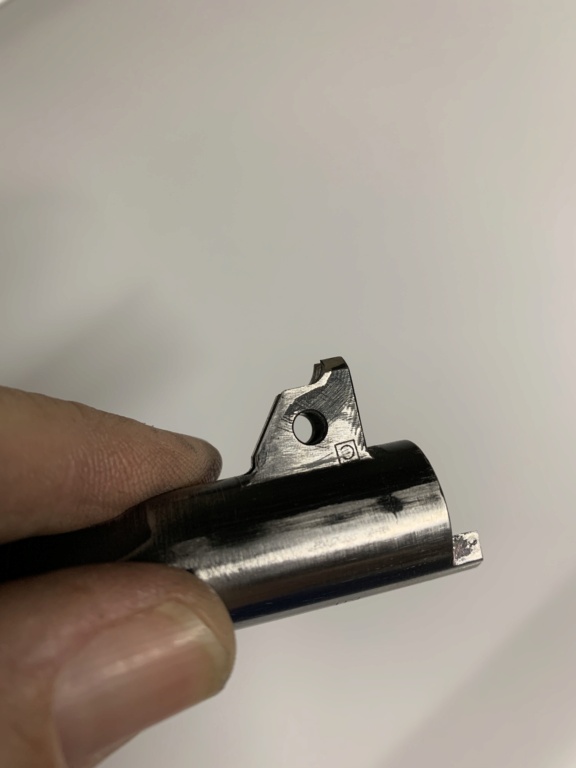
I don't like any radius except a very small one to break the edge. I have posted a photo that Jon provided a while ago a few times. I guess I can make a photo of one of my lower lugs. I'll post Jon's photo again.
Those of you familiar with Trig will understand that by radiusing the leading edge of the lower lug the angle of contact gets smaller. That will increase the upper force on the upper side of the barrel. In other words the barrel is pushed up as with a wedge. As the case is loaded into the chamber it pushes on the barrel, as the lower lug's to slide stop pin contact angle is lowered upper pressure is increased. As the barrel moves forward the angle get smaller and amplification of the force gets larger. In addition the friction created as the upper part of the barrel contacts the slide forward force on the barrel increases from friction. It becomes a cascading increase in pressure. Slows forward travel and in some cases stops it! Done as in the photo that force multiplication is at a minimum. The upper force is demonstrated by the "bump" as the slide closes just before locking lugs align. In my gun with the lower lug done as in the photo there is NO "bump"! My slide almost closes as if there is no cartridge being loaded due to the force amplification is very low.
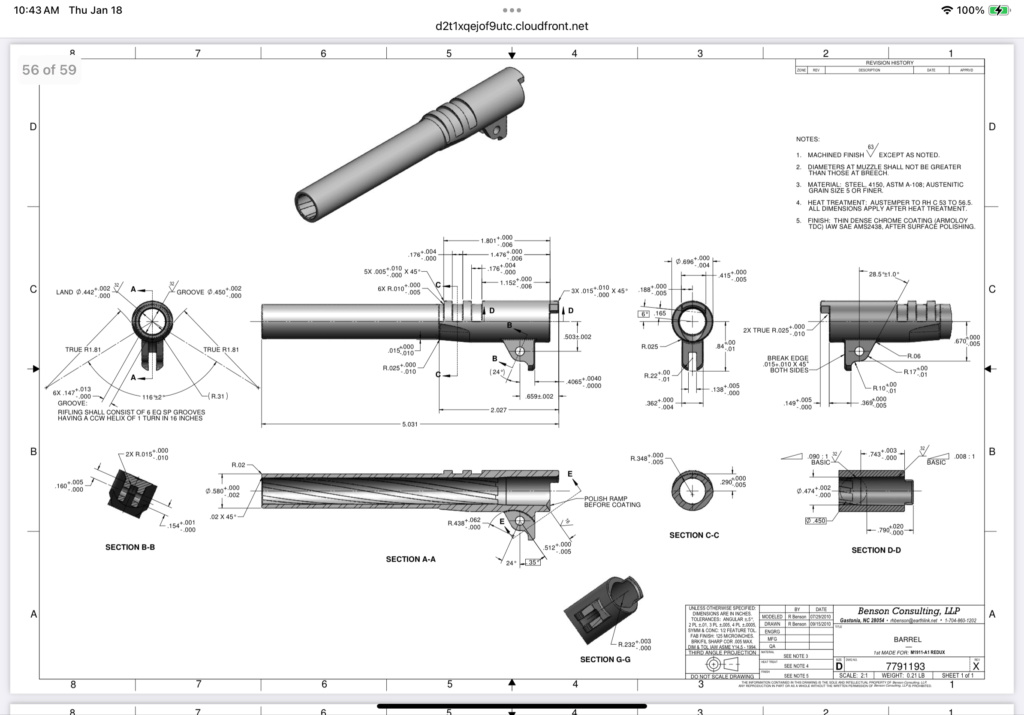
That drawing provided by Woobbley is of a GI barrel used in a issued 1911 that will work great with loose slide, loose bushing, loose slide stop pin and 230gr ball ammo. Put those parts as in all the other drawings (I have the compete set) together as a typical WW2 1911 was will never be a bullseye gun.

Froneck- Posts : 1693
Join date : 2014-04-05
Age : 76
 Re: Main spring and trigger adjustments
I just found my receipts and the firing pin is an EGW part # 10072 .068” diameter, and NOT titanium.
hengehold- Posts : 418
Join date : 2017-11-26
Location : VA
 Re: Main spring and trigger adjustments
The primers in the photos look well hit. But no indication was made by you as
to which ones were double struck. a few photos of those that didn't fire on the first strike will help. It's possible that those that the pin hit looks smeared are double struck. Have any idea as to what weight firing pin spring is being used?
to which ones were double struck. a few photos of those that didn't fire on the first strike will help. It's possible that those that the pin hit looks smeared are double struck. Have any idea as to what weight firing pin spring is being used?
Last edited by Froneck on 1/18/2024, 10:11 pm; edited 1 time in total
Froneck- Posts : 1693
Join date : 2014-04-05
Age : 76
 Re: Main spring and trigger adjustments
I don’t see a poundage rating listed on the EGW site but it has the ISMI PREMIUM 1911 FIRING PIN SPRING. SKU:10600
It looks like I should replace the spring with another one because When I looked at the ISMI site I found “Offered in two separate spring rates to allow for tuning, both are considered heavier than factory to ensure the firing pin stop from falling out.”
It looks like I should replace the spring with another one because When I looked at the ISMI site I found “Offered in two separate spring rates to allow for tuning, both are considered heavier than factory to ensure the firing pin stop from falling out.”
hengehold- Posts : 418
Join date : 2017-11-26
Location : VA
 Re: Main spring and trigger adjustments
I spoke to the smith yesterday and explained the situation: he recommended the following:
1. Replace the extra light hammer (EGW) with a heavier hammer.
2. Use a standard weight firing pin spring if pistol currently has one that is heavier than standard.
3. Increase weight of main spring from 19# to 20-21#.
4. Adjust sear spring to improve trigger pull to counteract the effects of installing the heavier main spring.
I guess I’ll give these steps a try and see how it goes. If I can get to an acceptable trigger pull and the hammer/pin spring help eliminate light strikes then I suppose it is a win.
I will also check some of the measurements that have been suggested in this thread such as headspace and barrel movement.
hengehold- Posts : 418
Join date : 2017-11-26
Location : VA
 Re: Main spring and trigger adjustments
Simply put what you expect to do will probably not help the overall situation. Yes your maybe light hit problem will be corrected, but you did end the problem before by installing a heavier main spring! Keep in mind a bullseye gun is a composite of parts that interact together to give desired results. Change one and that effects others but when you change quite a few together you don't know what your going to get! You can't simply change the hammer and expect the existing sear to work the same way!
A bullseye gun is one that a knowing smith fits the parts together so when combined as required will preform the desired task. As I mentioned a service issued 1911 will not be good for bullseye however a bullseye gun will not be a good service pistol for the soldier in the field!
A bullseye gun is one that a knowing smith fits the parts together so when combined as required will preform the desired task. As I mentioned a service issued 1911 will not be good for bullseye however a bullseye gun will not be a good service pistol for the soldier in the field!
Froneck- Posts : 1693
Join date : 2014-04-05
Age : 76
hengehold likes this post
 Re: Main spring and trigger adjustments
Headspace measures at .907 using an empty case and including gap from case head to end of hood. This is less than the .920 max
hengehold- Posts : 418
Join date : 2017-11-26
Location : VA
 Re: Main spring and trigger adjustments
Maybe I’ll just take this thing with me to California in a couple months and have Jon E. Put a new barrel in it.
hengehold- Posts : 418
Join date : 2017-11-26
Location : VA
 Re: Main spring and trigger adjustments
.920" is a max amount! You don't need more! So .907" should be OK. What is the gap measured between the head of the case and the hood? (SAAMI spec .898" to .920")
Taking the gun to Jon would be the best! He can determine what needs to be done! I think the smith you were talking to didn't know much!
Taking the gun to Jon would be the best! He can determine what needs to be done! I think the smith you were talking to didn't know much!
Last edited by Froneck on 1/19/2024, 8:57 pm; edited 3 times in total
Froneck- Posts : 1693
Join date : 2014-04-05
Age : 76
 Re: Main spring and trigger adjustments
Froneck wrote:.920" is a max amount! You don't need more! So .907" should be OK. What is the gap measured between the head of the case and the hood? (SAAMI spec .898" to .920")
Taking the gun to Jon would be the best! He can determine way needs to be done! I think the smith you were talking to didn't know much!
Case was .888 long and gap was .018/.019.
hengehold- Posts : 418
Join date : 2017-11-26
Location : VA
 Re: Main spring and trigger adjustments
Actually that is not the head space, that would be the distance to the face of the slide. Put thin strips of paper in between the hood and slide, one at a time and close the slide until paper is tight. How many strips were needed to have a tight fit?
Froneck- Posts : 1693
Join date : 2014-04-05
Age : 76
 Re: Main spring and trigger adjustments
As others have said your barrel was not fit correctly. Light hits or not, off center hits are not acceptable on a "professionally" installed barrel. It seems barrel fit is your main issue and could be the whole problem. And hearing a gunsmith told you to adjust your sear spring is concerning. Be careful making these adjustments without experience. I've witnessed a 45 going full auto on a shooter next to me, it's instant and uncontrollable. very dangerous. Please be careful.
rrampe- Posts : 19
Join date : 2023-10-21
Location : Honeoye,NY
 Re: Main spring and trigger adjustments
rrampe wrote:As others have said your barrel was not fit correctly. Light hits or not, off center hits are not acceptable on a "professionally" installed barrel. It seems barrel fit is your main issue and could be the whole problem. And hearing a gunsmith told you to adjust your sear spring is concerning. Be careful making these adjustments without experience. I've witnessed a 45 going full auto on a shooter next to me, it's instant and uncontrollable. very dangerous. Please be careful.
Thank you for your points about the sear spring. I have decided I’ll just have someone rebarrel it. I have heard stories of full auto/runaway 1911s when the there is not enough sear pressure. I’ll avoid this For now.
hengehold- Posts : 418
Join date : 2017-11-26
Location : VA
rrampe likes this post
 Re: Main spring and trigger adjustments
After Jon corrects the problem it would be nice if you or Jon reported what was done and what was the cause of the problem.
Froneck- Posts : 1693
Join date : 2014-04-05
Age : 76
hengehold and djperry2 like this post
Page 3 of 4 •  1, 2, 3, 4
 Similar topics
» Main spring vs recoil spring
» Main spring used
» Main Spring Housing
» Sear spring adjustments question?
» Hammerli Main Spring, How to Change
» Main spring used
» Main Spring Housing
» Sear spring adjustments question?
» Hammerli Main Spring, How to Change
Page 3 of 4
Permissions in this forum:
You cannot reply to topics in this forum|
|
|

